도형 그리기
| void drawLine(int x1, int y1, int x2, int y2) | 선그리기 |
| void drawOval(int x, int y, int w, int h) | 타원그리기 |
| void drawRect(int x, int y, int w, int h) | 사격형 그리기 |
| void drawRoundRect(int x, int y, int w, int h, int arcWidth, int arcHeight) | 모서리가 둥근 사각형 그리기 |
Graphics의 drawLine()메소드로 선그리기
|
import javax.swing.*; import java.awt.*;
public class GraphicsDrawLineEx extends JFrame { private MyPanel panel = new MyPanel();
public GraphicsDrawLineEx() { setTitle("drawLine 사용 예제"); setDefaultCloseOperation(JFrame.EXIT_ON_CLOSE); setContentPane(panel);
setSize(200, 170); setVisible(true); }
class MyPanel extends JPanel { public void paintComponent(Graphics g) { super.paintComponent(g); g.setColor(Color.RED); // 빨간색 선택 g.drawLine(20, 20, 100, 100); // 선그리기 } }
public static void main(String [] args) { new GraphicsDrawLineEx(); } } |
실행 결과]

원호와 폐다각형 그리기
| 원호 그리기 | void drawArc(int x, int y, int w, int h, int startAngle, int arcAngle) |
| x, y좌표에서 w, x, h크기의 사각형에 재접하는 원호를 그린다. 3시 방향을 0도 기점이다. startAngle 지점에서 arcAngle 각도만큼 원호를 그린다. arcAngle이 양수이면 반시계 방향, 음수이면 시계 방향으로 그린다. | |
| 폐다각형그리기 | void drawPloygon(int []x, int []y, int n) |
| x, y 배열에 저장된 점들 중 n개를 연결하여 폐다각형을 그린다. | |
도형 칠하기
그리기 메소드 명에서 draw를 fill로 바꾸면 도형안에 색을 칠할 수 있다.
|
g.setColor(Color.RED); // 빨간색 설정 g.fillRect(10, 10, 50, 50); // 사각형안에 빨간색으로 칠한다. |
도형 칠하기예
|
import javax.swing.*; import java.awt.*;
public class GraphicsFillEx extends JFrame { private MyPanel panel = new MyPanel();
public GraphicsFillEx() { setTitle("fillXXX 사용 예제"); setDefaultCloseOperation(JFrame.EXIT_ON_CLOSE); setContentPane(panel);
setSize(360, 300); setVisible(true); }
class MyPanel extends JPanel { public void paintComponent(Graphics g) { super.paintComponent(g); g.setColor(Color.RED); g.fillRect(10,10,100,100); // 빨간색사각형칠하기 g.setColor(Color.BLUE); g.fillOval(120,10,100,100); // 파란색타원칠하기 g.setColor(Color.GREEN); g.fillRoundRect(230,10,100,100,20,20); // 초록색둥근사각형칠하기 g.setColor(Color.MAGENTA); g.fillArc(10,120,100,100,0,270); // 마젠타색원호칠하기 g.setColor(Color.ORANGE); int []x ={120,170,220,170}; int []y ={180,130,180,230}; g.fillPolygon(x, y, 4); // 오렌지색 다각형 칠하기 } }
public static void main(String [] args) { new GraphicsFillEx(); } } |
실행 결과]

이미지 그리기
이미지 그리는 2가지 방법
1. JLable 컴포넌트를 이용하여 이미지그리기
2. Graphics 의 메소드를 이용하여 이미지 그리기
JLablel를 이용하여 이미지를 출력
| ImageIcon image = new ImageIcon("images/apple.jpg"); // 이미지 파일 읽기 JLable lable = new JLable(image); // 읽은 이미지를 출력할 레이블 컴포넌트 만들기 panel.add(label); // 레이블 컴포넌트를 패널에 부착하여 출력 |
Graphics로 이미지 그리기
| boolean drawImage(Image img, int x, int y, Color bgColor, ImageObserver observer) | |
| boolean drawImage(Image img, int x, int y, ImageObserver observer) | |
| bgColor : 이미지가 투명한 부분을 가지고 있을 때 투명한 부분에 칠해지는 색상 obserder : 이미지 그리기의 완료를 통보받는 객체 |
크기 조절하여 그리기
| boolean drawImage(Image img, int x, int y, int width, int height, Color bgColor, ImageObserver observer) |
| boolean drawImage(Image img, int x, int y, int width, int height, ImageObserver observer) |
원본의 일부분을 크기 조절하여 그리기
| boolean drawImage(Image img, int dx1, int dy1, int dx2, int dy2, int sx1, int sy1, int sx2, int sy2, Color bgColor, ImageObserver observer) |
| boolean drawImage(Image img, int dx1, int dy1, int dx2, int dy2, int sx1, int sy1, int sx2, int sy2, ImageObserver observer) |
이미지 로딩 : Image 객체 생성
| ImageIcon icon = new ImageIcon("images/image0.jpg"); // 파일로부터 이미지 로딩 Image img = icon.getImage(); // 이미지 정보 추출 |
이미지의 포과 높이 알아내기
| int width = img.getWidth(this); // 이미지의 폭. this는 ImageObserver로서, null도 가능 int height = img.getHeight(this); // 이미지 높이 |
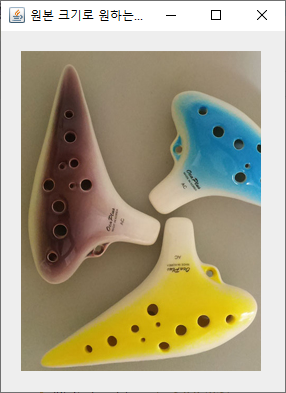
(20, 20)위치에 이미지 원본 크기로 그리기
|
class MyPanel extends JPanel { public void paintComponent(Graphics g) { super.paintComponent(g); g.drawImage(img, 20, 20, this); } } |
이미지를 (20, 20) 위치에 10 * 100 크기로 그리기
|
class MyPanel extends JPanel { public void paintComponent(Graphics g) { super.paintComponent(g); g.drawImage(img, 20, 20, 100, 100, this); } } |
이미지를 패널의 크기에 꽉 차도록 그리기
|
class MyPanel extends JPanel { public void paintComponent(Graphics g) { super.paintComponent(g); g.drawImage(img, 0, 0, this.getWidth(), this.getHeight(), this); } } |
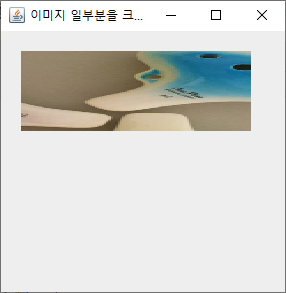
원본 이미지의 일부분을 크기 조정하여 그리기
|
class MyPanel extends JPanel { public void paintComponent(Graphics g) { super.paintComponent(g); g.drawImage(img, 20, 20, 250, 100, 50, 0, 150, 150, this); } } |
이미지 그리기
|
import javax.swing.*; import java.awt.*;
public class GraphicsDrawImageEx1 extends JFrame { private MyPanel panel = new MyPanel();
public GraphicsDrawImageEx1() { setTitle("원본 크기로 원하는 위치에 이미지 그리기"); setDefaultCloseOperation(JFrame.EXIT_ON_CLOSE); setContentPane(panel);
setSize(300, 400); setVisible(true); }
class MyPanel extends JPanel { private ImageIcon icon = new ImageIcon("images/image1.jpg"); // 이미지 로딩 private Image img = icon.getImage(); // 이미지 객체
public void paintComponent(Graphics g) { super.paintComponent(g);
// 이미지를 패널의(20,20)에 원래의 크기로 그린다. g.drawImage(img, 20, 20, this); } }
public static void main(String [] args) { new GraphicsDrawImageEx1(); } } |
실행 결과]

JPanel로 만든 패널에 꽉 차도록 이미지 그리기
|
import javax.swing.*; import java.awt.*;
public class GraphicsDrawImageEx2 extends JFrame { private MyPanel panel = new MyPanel();
public GraphicsDrawImageEx2() { setTitle("패널의 크기에 맞추어 이미지 그리기"); setDefaultCloseOperation(JFrame.EXIT_ON_CLOSE); setContentPane(panel);
setSize(200, 300); setVisible(true); }
class MyPanel extends JPanel { private ImageIcon icon = new ImageIcon("images/image1.jpg"); // 이미지 로딩 private Image img = icon.getImage(); // 이미지 객체
public void paintComponent(Graphics g) { super.paintComponent(g);
// 이미지를 패널 크기로 조절하여 그린다 g.drawImage(img, 0, 0, getWidth(), getHeight(), this); } }
public static void main(String [] args) { new GraphicsDrawImageEx2(); } } |
실행 결과]

이미지의 일부분을 크기 조절하여 그리기
|
import javax.swing.*; import java.awt.*;
public class GraphicsDrawImageEx3 extends JFrame { private MyPanel panel = new MyPanel();
public GraphicsDrawImageEx3() { setTitle("이미지 일부분을 크기 조절하여 그리기"); setDefaultCloseOperation(JFrame.EXIT_ON_CLOSE); setContentPane(panel);
setSize(300, 300); setVisible(true); }
class MyPanel extends JPanel { private ImageIcon icon = new ImageIcon("images/image1.jpg"); private Image img = icon.getImage();
public void paintComponent(Graphics g) { super.paintComponent(g);
// 이미지의 (100,50)에서 (200,200)의 영역을 패널상의 (20,20)에서 (250,100) 의 영역으로 확장하여 그린다. g.drawImage(img, 20, 20, 250, 100, 100, 50, 200, 200, this); } }
public static void main(String [] args) { new GraphicsDrawImageEx3(); } } |
실행 결과]

'프로그램언어 > 자바' 카테고리의 다른 글
| 컬렉션 프레임워크 문제 (0) | 2020.11.08 |
|---|---|
| 스윙 컴포넌트 그리기3 (0) | 2020.11.05 |
| 스윙 컴포넌트 그리기1 (0) | 2020.11.05 |
| 스윙 컴포넌트의 공통 메소드5 (0) | 2020.11.05 |
| 스윙 컴포넌트의 공통 메소드4 (0) | 2020.11.05 |


